As I am preparing to give the Camembert workshop in Canberra on 16th of November, I thought it would be good to put down some basics.
When I first tried to make Camembert (Cam for short) couple years back, I was reading horrible results like slip-skin, ammonia smell, pungent aroma, contamination during the aging etc and was thinking that, this must be one of the hardest recipes (don’t get me wrong, the hardest was Comte) I was going to try. After much reading and trying to put together a recipe with floc, pH and correct ripening requirements, I realized that, it wouldn’t be so hard to make this cheese.
As I am an engineer, technicality of making this cheese; once written down to every details, didn’t scare me much. Once I have got the confidence, I started gathering necessary cultures.
There are 2 cultures that will grow that white musroomy skin on the cheese. These are Geotrichum candidum and Penicillium candidum. While it is possible to harvest these cultures from shop bought cams or bries, I recommend buying the actual culture from cheesemaking suppliers. I will explain why.
Most slip skin problems occurring during the aging are the result of too much moisture left in the cheese that give lactic acid bacteria more food as lactose and before PC or GC takes over. Availability of lactic acid overworks the P and G Candidum. Also ripening temperatures during the warmer months will accelerate this process.
There are two ways of attacking this problem to solve. First of all get your temp and humidity controlled environment for ripening into a stable level. And the second is to use a good culture strain to prevent slip skin. As this cheese is a fresh and high moisture cheese, contamination problems are also very prominent among the artisan cheesemakers. If you are trying to harvest white mould from shop bought cams and bries, you may be inviting other moulds and bacteria unknowingly, which will create problems with your making.
MILK
I use mixture of fresh, raw cow’s and goat’s milk for my cams. I have tried using lipase with cow’s milk only but my taste buds were not agreed. If I have the chance of using only goat’s milk, I would go for it.
Whatever the milk you use, if you don’t trust the source or getting shop bought milk, please pasteurize before use by keeping it at 65C for 25 minutes and cooling it to renneting temperature immediately in an ice bath.
I don’t add any extra cream as I don’t have a source of cream but if you want to make a double brie, you may try.
CULTURE
The starter culture for this cheese is mesophilic. Any mesophilic will do. Diacetylactis variants will give a buttery flavor and if you are trying Cambozola, I recommend a gas producing starter like Flora Danica or adding yeast specifically designed to make holes in cheese (not P. Shermanii like in Swiss cheese).
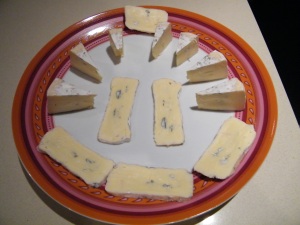
One day I used only goat’s milk for Cambozola (love child of Camembert and Gorgonzola) and the resulting cheese was one of the best aromatic cheeses I have ever made so much so that I can not eat normal cam/brie any more.
DRAINING BASKETS
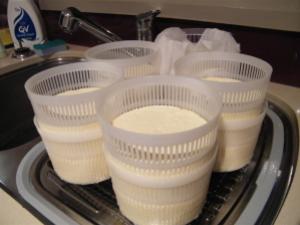
Forget about bamboo mats and sandwiches. Hard to use, hard to manage and harbors unwanted bacteria. I am using a single plastic draining basket. They are cheap, works well and stack-able for extra draining. I bought 7 of these and use it for feta and cam. They are very easy to use.
BRINE
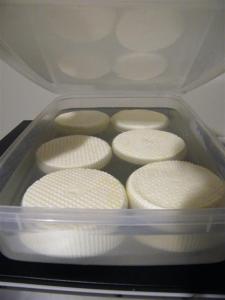
Most recipes on the internet will tell you to dry salt the cam with about 3% of the cheese’s weight. As I make cheese at home, I always have brine available and I always brined cams rather than dry salting. Cam is a small cheese and 2 hours of brining in a saturated brine will do. Brine bowl/bucket should be kept in the ripening fridge at about 10 to 14C and top surface of the cheese should be sprinkled with salt to prevent contamination and also should be flipped after first hour and sprinkled with salt again. Flipping is necessary to get the salt sucked in equally on both sides.
AGING CONTAINER
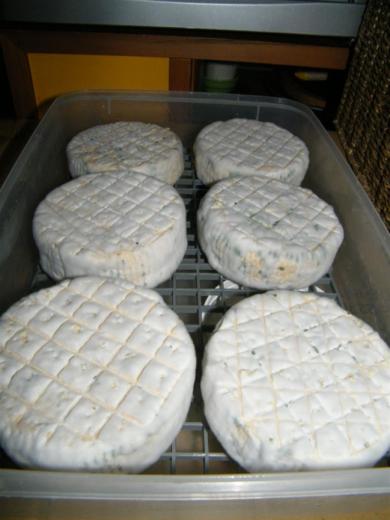
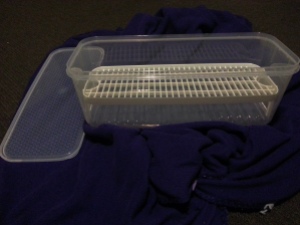
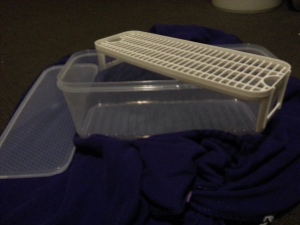
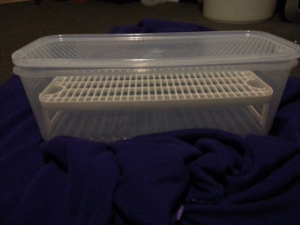
There are food grade plastic boxes available with half way shelves in them. The one I found in the picture takes 3 cams in it and perfectly fits in my cheese fridge. Also because the wholes are larger, it does not interfere with the P.C. development. This humidity chamber shall be kept in the cheese cave and the humidity should be contained around 95%. The box should not develop water beads on the sides and lids and during the first couple of days; it should be drained and wiped with a cloth (cloth dunked in 1:1 vinegar, methylated spirit solution to sterilize). The cheeses should be flipped everyday once or twice to assist P.C. development.
MAKE
8 liters of milk will give you about 5 cams depending on the size of baskets you use. Only goat or half goat half cow milk will do. Make sure you also have enough ripening containers.
Mesophilic Starter either DVI (as per manufacturer’s measure) or mother culture (%2 of milk so for 8 liters, use 160ml MC)
PC or GC or mixture of these.
Rennet (as per manufacturer’s measure)
If pasteurizing your milk, cool it down to 30C in an ice bath and keep the temp constant through out the making.
Add your starter and PC or GC into the milk and stir well.
Wait about an hour or if you have a pH meter, wait till you read pH6.4.
During the milk ripening period above, stir the milk every 15 minutes to get the culture distributed evenly.
Add diluted rennet and stir well. Make sure rennet is not expired and the water used for dilution is filtered and does not contain chlorine and other nasties.
Rest the milk for an hour and keep the temp constant at 30 to 32C as much as you can. Running kids, pets should be prevented. If the temp drops, do not heat it on stove as the heat will not distribute evenly. Use a hot water bath in your sink.
After an hour, check for clean break, If the curd is breaking cleanly, it is time to cut.
Cut the curd to about 2cm cubes. Stir with a ladle from bottom to top and find those bigger curds to cut them.
Once you finish cutting, let curds “heal” for 5 minutes.
Stir every 10 minutes to break the curds (as they stick together again) gently. Check the look and feel of the curds, after a while, they should shrink, firm up and get a glossy look. If they are still big and do not shine; continue stirring every 10 minutes.
Once you get that glossy look, remove the whey to the level of curds and start filling the baskets with curds.
The baskets I am using are 8cm tall. So I fill them up to the top. When the curds drained, they come to around 3cm tall disks which look like the commercial cams.
Drain at room temperature without any weight. To be honest, I stack 2 baskets on top of each other and then flip the cheese regularly (if it can be handled easily) in the baskets as well as taking the top basket to bottom. This speeds up the draining stage.
After draining overnight and both sides are flat and uniform, take them into brine for salt infusing. Salt helps the aroma to develop. If dry salting, make sure you use about 2% or 3% salt compared to the weight of each cheese. Brine time is 2 hours with flipping after first hour.
Once they are brined or dry salted, they are ready to go into cheese cave in a humidity chamber.
Cheese cave should be adjusted to between 10 to 12C and the humidity will be kept constant by the boxes we use.
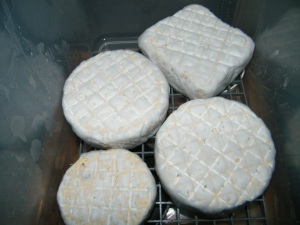
Place the cheeses in the fridge and flip them everyday. After couple of days, you will see white fury skin developing. Drain excess whey in the containers and wipe the boxes to remove water.
Once the entire cheese surface develops white mould (about end of first week), wrap them in cooking paper and aluminium wrapping. Place them in your normal fridge at 4C for further aging.
The entire aging is about 4 weeks depending on temperature and moisture level in the cheese, starts in the humidity box till it finishes in refrigerator. Test the cheese by pressing the centre gently in its wrapping. If it is soft to touch, consume.
VARIATIONS
Try washing the cheeses with unpasteurized beer or wine every second day during the mould growing period.
Make vegetable ash and cover the cheese with it as soon as they come out of brining. This helps PC development and prevents slip skin
Wash the cheese with a Brevi Linen morge every day.

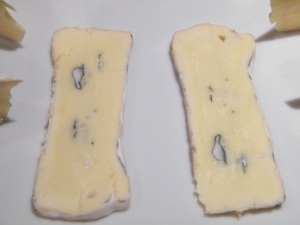
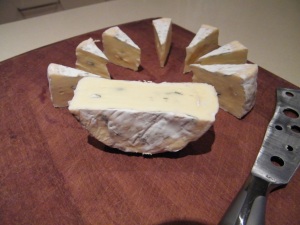

Great recipe Gukan. It looks like a vast improvement on the one that I use. I never thought to brine the cheese after the first day. This takes all the guess work out of salting.
Also, I love the way you use the baskets on top of each other. I will remember to try this next time.
Thanks, Gavin
P.S. I added your blog to my Little Green Cheese blog roll. I didn’t realise that you had started a new cheese making blog in English. Well done!
Reblogged this on Moonshire Meadow and commented:
I haven’t tried my hand at cheese yet, but I’m reading about it, so when our goats come into milk in the spring (after kidding), I’ll be ready.
Cool Diane. Goat farming is also something I want to get into. Did you read this http://www.bookdepository.co.uk/Natural-Goat-Care-Pat-Coleby/9780911311662
Pingback: Camembundy & The MiniCams Join The League Of YEG Home Cheese Makers. | Much To Do About Cheese
Pingback: Cheese Making Course Cancelled - The Greening of Gavin
Hi folks, I’ve tried making camembert a few times but each time it goes wrong at the last minute. The mould usually forms between 1 and 2 weeks but then, instead of ripening properly, the inside turns to liquid and becomes bitter. What am I doing wrong?
Hi Stef, Use slightly less rennet and reduce the ripening temperature. Also reducing PC and starter culture is an option. Are you draining the cheeses before going into the ripening chamber? Leaving too much moisture in the cheese means more food resources for the cultures.
Hi Gurkan, thanks for that. I usually drain the cheeses overnight, turning every hour or so during the day. I think it may be a combination of several small things adding up to make it ripening process happen too quickly so I’ll definitely try your suggestions. Thanks again.
Pingback: LGC 016 - Fifteen Uses for Whey - Little Green Cheese
Pingback: LGC 018 - A Chat with Ian Treuer - Little Green Cheese
I really like your aging containers. What are they called and can you share who sells them?
They are cupcake trays from Target. Decor brand tellfresh 2-storey storer.
Hi Gurkan,
I did the cheesemaking course with you in November, I just tried some of the camembert and it was perfect, and there was zero impurities!
Hi Alex, I am glad it all worked out for you. 🙂
Gurkan,
Being new too cheese making, I’m sure I’m in over my head. One of my first tries was cambozola. I did the wet brine but as I went to load it into the ripening box one simply fell apart. The other isn’t in much better condition. I saved what was left just to see what would happen. Darn if they didn’t start to mould as they were supposed too. The broken one is almost gone as it tastes so good and I’m getting ready to wrap the near whole one for maturing. I guess the curd just didn’t knit properly. I want to try again but using a kefir starter as I understand kefir, along with being both meso/thermophelic also contains yeasts that propagate holes for the P. roquefordi. Any ideas?? Did I over dry the curd? Or should I have pressed them a bit? Also, I’m obtaining my starter P. roquefordi and camemberdi from ripened cheeses so it’s a bit of a toss up as too just how much per gal. of milk. Thanks for any suggestions you may have. Outside of hopefully, ‘leave cheese making too someone a bit more experienced’. Lol. I love to experiment and beside, I’ve already bought a small bar frig. for my ‘cheese cave’. I’m hooked.
Sincerely,
Paul
Hi Paul,
The good thing is it is not wasted 🙂
To get a strong curd, it is advisable to add a bit of Calcium Chloride. Increasing the rennet about 0.1ml or ripening the milk longer or adding more starter might help. Increasing the temperature about 1 centigrad degree also usefull.
Kefir starter should be real kefir out of kefir gem (grains). Only then you will get Geotrichium Candidum. There is no Pencillium Candidum in kefir unless there is contamination. G. Candidum works as good as P. Candidum. To get the holes in the cambozola kefir works but you need to cook the curd just a little bit to 32C so that yeasts in there activated. When you drain the curds into baskets, keep them warm for about an hour and they will bloom. They may blow a bit in the brine but not too much though this depends on the cultures in your kefir.
I press the cams by stacking two baskets on top of each other and flipping them regularly.
Obtaining your cultures espacially P. Roqueforti and camembert rinds (PC or GC) is okay. They will work. You can even propogate dry rye bread pieces with P. Roqueforti and you will get more culture with the mould covering the bread and consuming to nothing.
Bar fridge is good, I have one too.
Cheers,
Gurkan,
Thank you so very much for your instruction and encouragement. I believe I’ve found a source for raw goats’ milk and can’t wait til I can get my hands on some and perfect cambozola. Just based on the results of my one mistake using cows’ milk, and still…. Phenomenal flavor.
Please continue to share your instruction. Especially any knowledge and work you may do with natural sources for cultures, amounts, recipes etc.. I’ve just ordered ‘real’ kefir and am anxious to learn more.
Thx Again and Please Be Well,
Paul
My pleasure Paul 🙂
Gurkan,
It’s been a couple weeks or so now. Despite the mistakes of my early learning process, I’ve had noting but delightful success. Thankfully, cheeses are a bit forgiving it seems. With your help, you’ve turned out another dedicated cheese maker. Next. Mushroom cam/blue with just a touch of good wine yeast. Am about to get a larger fridge/cheese cave too expand my efforts. Thx again for your help and encouragement. This is just fun.
Please be well.
Yaayyy. Another person converted 🙂
I think it is the most rewarding hobby I have ever taken and the missus at home is happy.
Before you know it, you will have couple extra fridges, equipment and half of the freezer occupied with cultures. Good luck.
Gurkan,
In no small part thanks too you Sir, this site decided to run an article on me. Should you be interested, behold what you’ve wrought. Thanks once again for your instruction and encouragement. Please be well.
http://blog.cheesemaking.com/
Hi Paul, that is awesome mate. I am reading right now.
Hi, I was hoping for some advice, I have some curds draining as I write this, I tasted some that had spilt out the sides and for some reason the curds taste sour. I know the milk was really fresh, is there something that could have caused it to go sour?
Hi Emily, Fresh milk may have local bacteria that caused this. Was it pasteurized? Next time try gently pasteurising it at 67C for half an hour and add your starter culture later when the temps went down to inoculating temperature.
Pingback: Making Camembert for Beginners-Part 2/Ordering Ingredients | A Better Whey
Merhaba Gürkan bey
Bir mazağadan Brie ve Camembert tipi peynir üretimi için peynir kültürü buldum içinde Streptococcus salivarius spp. thermophilus var , sadece bunu alıp Geotrichum candidum ve Penicillium candidum kültürleri yerine kullansam olur mu?
Geotrichum candidum ve Penicillium candidum alabiceğim bir yer bulamadım.
Hüseyin bey, olmaz. O bulduğunuz sadece starter kültür. Aromatik küf değil. Camembert peynirini belenderdan süt ile geçirip kullanabilirsiniz.